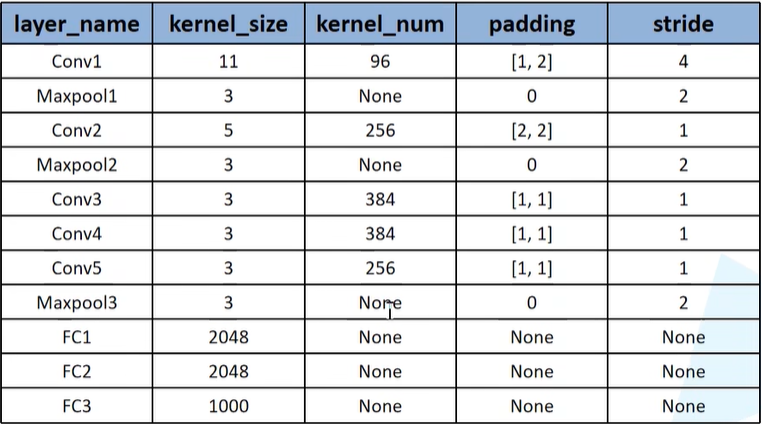
AlexNet网络架构
搭建AlexNet
工程目录
1
2
3
4
5
6
7
8
9
10
11
12
13
14
15
16
├── Test2_alexnet ├── model.py(模型文件) ├── train.py(调用模型训练) ├── predict.py(调用模型进行预测) └── class_indices.json(将索引和分类一一对应,代码运行之后会自动生成) └── data_set ├── split_data.py(自动将数据集划分成训练集train和验证集val(训练集:测试集 = 9 :1) └── flower_data ├── train(split_data.py分出来的) ├── flower_photos(split_data.py分出来的) └── flower_photos ├── daisy 雏菊 ├── dandelion 蒲公英 ├── roses 玫瑰 ├── sunflowers 向日葵 └── tulips 郁金香
1
2
3
4
5
6
7
8
9
10
11
12
13
14
15
16
17
18
19
20
21
22
23
24
25
26
27
28
29
30
31
32
33
34
35
36
37
38
39
40
41
42
43
44
45
46
47
48
49
import torchimport torch.nn as nnclass AlexNet (nn.Module): def __init__ (self, num_classes=1000 , init_weights=False ): super (AlexNet, self).__init__() self.features = nn.Sequential( nn.Conv2d(3 , 48 , kernel_size=11 , stride=4 , padding=2 ), nn.ReLU(inplace=True ), nn.MaxPool2d(kernel_size=3 , stride=2 ), nn.Conv2d(48 , 128 , kernel_size=5 , padding=2 ), nn.ReLU(inplace=True ), nn.MaxPool2d(kernel_size=3 , stride=2 ), nn.Conv2d(128 , 192 , kernel_size=3 , padding=1 ), nn.ReLU(inplace=True ), nn.Conv2d(192 , 192 , kernel_size=3 , padding=1 ), nn.ReLU(inplace=True ), nn.Conv2d(192 , 128 , kernel_size=3 , padding=1 ), nn.ReLU(inplace=True ), nn.MaxPool2d(kernel_size=3 , stride=2 ), ) self.classifier = nn.Sequential( nn.Dropout(p=0.5 ), nn.Linear(128 * 6 * 6 , 2048 ), nn.ReLU(inplace=True ), nn.Dropout(p=0.5 ), nn.Linear(2048 , 2048 ), nn.ReLU(inplace=True ), nn.Dropout(p=0.5 ), nn.Linear(2048 , num_classes), ) if init_weights: self._initialize_weights() def forward (self, x ): x = self.features(x) x = torch.flatten(x, start_dim=1 ) x = self.classifier(x) return x def _initialize_weights (self ): for m in self.modules(): if isinstance (m, nn.Conv2d): nn.init.kaiming_normal_(m.weight, mode="fan_out" ) if m.bias is not None : nn.init.constant_(m.bias, 0 ) if isinstance (m, nn.Linear): nn.init.normal_(m.weight, 0 , 0.01 ) nn.init.constant_(m.bias, 0 )
创建类AlexNet,继承于父类nn.Module
1 class AlexNet (nn.Module):
通过初始化函数来定义AlexNet网络在正向传播过程中所需要使用到的一些层结构
1
2
3
4
5
def __init__ (self, num_classes=1000 , init_weights=False ): super (AlexNet, self).__init__() super ().__init__()
nn.Sequential模块
这里与Pytorch官方demo不一样的是:使用到nn.Sequential模块 。nn.Sequential能够将一系列的层结构进行打包,组合成一个新的结构,在这取名为features。features代表专门用于提取图像特征的结构。
为什么使用nn.Sequential模块?——精简代码,减少工作量
1 self.features = nn.Sequential(
padding用法解释
卷积核大小:11;卷积核个数原模型是96:由于数据集较小和加快运算速度,因此这里取一半48 ,经检测正确率相差不大;输入的图片是RGB的彩色图片:3;
padding有两种写的类型:一种是整型,一种是tuple类型。当padding=1时,代表在图片上下左右分别补一个单位的0 。如果传入的是tuple(1, 2):1代表上下方各补一行0;2表示左右两侧各补两列0 。
如果想要实现第一层的padding在上一堂课中讲到,是在最左边补一列0,最上面补一行0,最右边补两列0,最下面补两行0。nn.ZeroPad2d((1,2,1,2)):左侧补一列,右侧补两列,上方补一行,下方补两行 。
这里使用padding = 2,按照公式计算出来结果为55.25,在Pytorch中如果计算结果为小数,会自动将小数点去掉。
1 2 nn.Conv2d(3 , 48 , kernel_size=11 , stride=4 , padding=2 ),
inplace参数理解为Pytorch通过一种方法增加计算量,但降低内存使用
1 2 3 4 5 6 7 8 9 10 11 12 13 14 15 16 17 18 19 nn.ReLU(inplace=True ), nn.MaxPool2d(kernel_size=3 , stride=2 ), nn.Conv2d(48 , 128 , kernel_size=5 , padding=2 ), nn.ReLU(inplace=True ), nn.MaxPool2d(kernel_size=3 , stride=2 ), nn.Conv2d(128 , 192 , kernel_size=3 , padding=1 ), nn.ReLU(inplace=True ), nn.Conv2d(192 , 192 , kernel_size=3 , padding=1 ), nn.ReLU(inplace=True ), nn.Conv2d(192 , 128 , kernel_size=3 , padding=1 ), nn.ReLU(inplace=True ), nn.MaxPool2d(kernel_size=3 , stride=2 ),
classifier全连接层
classifier包含之后的三层全连接层
1
2
3
4
5
6
7
8
9
10
11
12
self.classifier = nn.Sequential( nn.Dropout(p=0.5 ), nn.Linear(128 * 6 * 6 , 2048 ), nn.ReLU(inplace=True ), nn.Dropout(p=0.5 ), nn.Linear(2048 , 2048 ), nn.ReLU(inplace=True ), nn.Dropout(p=0.5 ), nn.Linear(2048 , num_classes), )
当搭建网络过程中传入初始化权重init_weights=trus,会进入到初始化权重函数
1
2
if init_weights: self._initialize_weights()
forward函数
forward函数中定义正向传播的过程。x代表输入的数据,数据指的是Tensor的通道排序:[batch, channel, height, width]
1
2
3
4
5
def forward (self, x ): x = self.features(x) x = torch.flatten(x, start_dim=1 ) x = self.classifier(x) return x
_initialize_weights函数
初始化权重函数
1 def _initialize_weights (self ):
遍历modules模块,modules定义中:返回一个迭代器,迭代器中会遍历网络中所有的模块。而言之,通过self.modules(),会迭代定义的每一个层结构
1 for m in self.modules():
遍历层结构之后,判断属于哪一个类别,此处为判断是否为卷积层
1
2
3
4
5
if isinstance (m, nn.Conv2d): nn.init.kaiming_normal_(m.weight, mode="fan_out" ) if m.bias is not None : nn.init.constant_(m.bias, 0 )
遍历层结构之后,判断属于哪一个类别,此处为判断是否为全连接层。如果传进来的实例是全连接层,那么会通过normal_(正态分布)给权重weight赋值,均值=0,方差=0.01,偏置初始化0
1
2
3
if isinstance (m, nn.Linear): nn.init.normal_(m.weight, 0 , 0.01 ) nn.init.constant_(m.bias, 0 )
1
2
3
4
5
6
7
8
9
10
11
12
13
14
15
16
17
18
19
20
21
22
23
24
25
26
27
28
29
30
31
32
33
34
35
36
37
38
39
40
41
42
43
44
45
46
47
48
49
50
51
52
53
54
55
56
57
58
59
60
61
62
63
64
65
66
67
68
69
70
71
72
73
74
75
76
77
78
79
80
81
82
83
84
85
86
87
88
89
90
91
92
93
94
95
96
97
98
99
100
101
102
103
104
105
106
107
import osimport jsonimport timeimport torchimport torch.nn as nnfrom torchvision import transforms, datasetsimport matplotlib.pyplot as pltimport numpy as npimport torch.optim as optimfrom model import AlexNetdevice = torch.device("cuda:0" if torch.cuda.is_available() else "cpu" ) print ("using {} device." .format (device))data_transform = { "train" : transforms.Compose([ transforms.RandomResizedCrop(224 ), transforms.RandomHorizontalFlip(), transforms.ToTensor(), transforms.Normalize((0.5 , 0.5 , 0.5 ), (0.5 , 0.5 , 0.5 ))]), "val" : transforms.Compose([ transforms.Resize((224 , 224 )), transforms.ToTensor(), transforms.Normalize((0.5 , 0.5 , 0.5 ), (0.5 , 0.5 , 0.5 ))])} data_root = os.path.abspath(os.path.join(os.getcwd(), ".." )) image_path = data_root + "/data_set/flower_data/" assert os.path.exists(image_path), "{} path does not exist." .format (image_path)train_dataset = datasets.ImageFolder(root=image_path + "/train" , transform=data_transform["train" ]) train_num = len (train_dataset) flower_list = train_dataset.class_to_idx cla_dict = dict ((val, key) for key, val in flower_list.items()) json_str = json.dumps(cla_dict, indent=4 ) with open ('class_indices.json' , 'w' ) as json_file: json_file.write(json_str) batch_size = 32 train_loader = torch.utils.data.DataLoader( train_dataset,batch_size=batch_size, shuffle=True ,num_workers=0 ) validate_dataset = datasets.ImageFolder( root=image_path + "/val" ,transform=data_transform["val" ]) val_num = len (validate_dataset) validate_loader = torch.utils.data.DataLoader( validate_dataset,batch_size=4 , shuffle=True ,num_workers=0 ) test_data_iter = iter (validate_loader) test_image, test_label = test_data_iter.__next__() def imshow (img ): img = img / 2 + 0.5 npimg = img.numpy() plt.imshow(np.transpose(npimg, (1 , 2 , 0 ))) plt.show() print (' ' .join('%5s' % cla_dict[test_label[j].item()] for j in range (4 )))imshow(utils.make_grid(test_image)) net = AlexNet(num_classes=5 , init_weights=True ) net.to(device) loss_function = nn.CrossEntropyLoss() optimizer = optim.Adam(net.parameters(), lr=0.0002 ) save_path = './AlexNet.pth' best_acc = 0.0 for epoch in range (10 ): net.train() running_loss = 0.0 t1 = time.perf_counter() for step, data in enumerate (train_loader, start=0 ): images, labels = data optimizer.zero_grad() outputs = net(images.to(device)) loss = loss_function(outputs, labels.to(device)) loss.backward() optimizer.step() running_loss += loss.item() rate = (step + 1 ) / len (train_loader) a = "*" * int (rate * 50 ) b = "*" * int ((1 - rate) * 50 ) print ("\rtrain loss: {:^3.0f}%[{}->{}]{:.3f}" .format (int (rate * 100 ), a, b, loss), end=" " ) print () print (time.perf_counter() - t1) net.eval () acc = 0.0 with torch.no_grad(): for data_test in validate_loader: test_image, test_label = data_test outputs = net(test_image.to(device)) predict_y = torch.max (outputs, dim=1 )[1 ] acc += torch.eq(predict_y, test_label.to(device)).sum ().item() accurate_test = acc / val_num if accurate_test > best_acc: best_acc = accurate_test torch.save(net.state_dict(), save_path) print ('[epoch %d] train_loss: %.3f test_accuracy: %.3f' % (epoch + 1 , running_loss / step, accurate_test)) print ('Finished Training' )
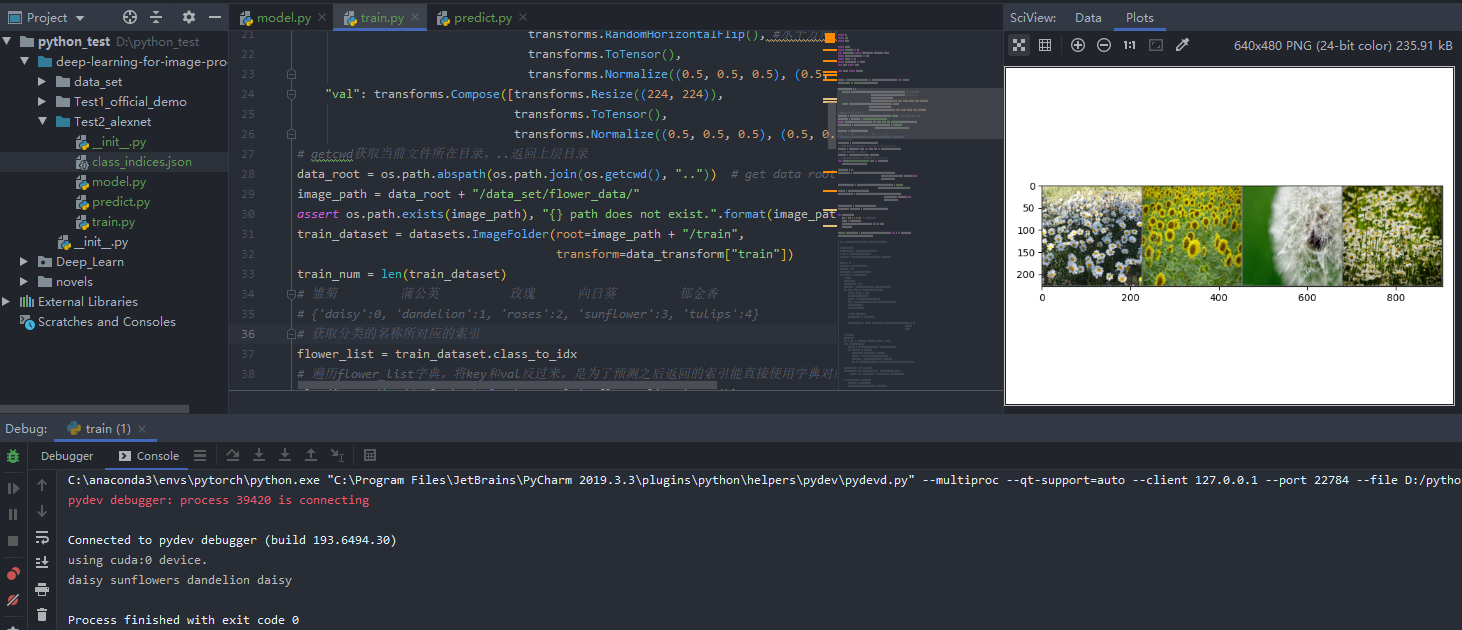
测试训练集
判断使用GPU还是CPU来训练,GPU会比CPU快几十倍,如果终端打印信息为cuda:0,则使用了GPU跑代码
1
2
device = torch.device("cuda:0" if torch.cuda.is_available() else "cpu" ) print ("using {} device." .format (device))
RandomResizedCrop:初始化图像尺寸,将图片尺寸全部改为224*224;RandomHorizontalFlip:水平方向随机翻转图像的函数,强化测试
1
2
3
4
5
6
7
8
data_transform = { "train" : transforms.Compose([transforms.RandomResizedCrop(224 ), transforms.RandomHorizontalFlip(), transforms.ToTensor(), transforms.Normalize((0.5 , 0.5 , 0.5 ), (0.5 , 0.5 , 0.5 ))]), "val" : transforms.Compose([transforms.Resize((224 , 224 )), transforms.ToTensor(), transforms.Normalize((0.5 , 0.5 , 0.5 ), (0.5 , 0.5 , 0.5 ))])}
确认数据集所在文件位置,getcwd获取当前文件所在目录,…表示返回上层目录,拓展:…/…表示返回上上层目录
1
2
3
4
5
data_root = os.path.abspath(os.path.join(os.getcwd(), ".." )) image_path = data_root + "/data_set/flower_data/" assert os.path.exists(image_path), "{} path does not exist." .format (image_path)train_dataset = datasets.ImageFolder(root=image_path + "/train" , transform=data_transform["train" ])
train_num表示一共多少训练图片,用来后续计算准确率,正确个数 / train_num
1 train_num = len (train_dataset)
{‘daisy’:0, ‘dandelion’:1, ‘roses’:2, ‘sunflower’:3, ‘tulips’:4}分别对应雏菊、蒲公英、玫瑰、向日葵、郁金香
flower_list:获取分类的名称所对应的索引
1 flower_list = train_dataset.class_to_idx
遍历flower_list字典,将key和val反过来,是为了预测之后返回的索引能直接使用字典对应到所属的类别
1 cla_dict = dict ((val, key) for key, val in flower_list.items())
通过json将cla_dict字典编码成json的格式
1 json_str = json.dumps(cla_dict, indent=4 )
打开class_indices.json文件,将json_str保存进去,为了方便预测时读取信息。这句代码将会在当前文件夹生成class_indices.json,如工程目录所示
1
2
with open ('class_indices.json' , 'w' ) as json_file: json_file.write(json_str)
进行训练
1
2
3
4
5
6
7
8
9
10
11
12
13
14
15
16
17
18
19
20
21
22
23
24
batch_size = 32 train_loader = torch.utils.data.DataLoader(train_dataset, batch_size=batch_size, shuffle=True , num_workers=0 ) validate_dataset = datasets.ImageFolder(root=image_path + "/val" , transform=data_transform["val" ]) val_num = len (validate_dataset) validate_loader = torch.utils.data.DataLoader(validate_dataset, batch_size=4 , shuffle=True , num_workers=0 ) test_data_iter = iter (validate_loader) test_image, test_label = test_data_iter.__next__() def imshow (img ): img = img / 2 + 0.5 npimg = img.numpy() plt.imshow(np.transpose(npimg, (1 , 2 , 0 ))) plt.show() print (' ' .join('%5s' % cla_dict[test_label[j].item()] for j in range (4 )))imshow(utils.make_grid(test_image))
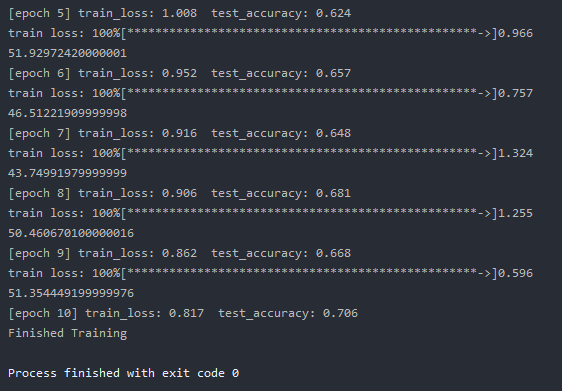
训练结果
构造模型
注释掉测试训练集的输出代码
1
2
3
4
5
6
7
8
9
10
11
12
net = AlexNet(num_classes=5 , init_weights=True ) net.to(device) loss_function = nn.CrossEntropyLoss() optimizer = optim.Adam(net.parameters(), lr=0.0002 ) save_path = './AlexNet.pth' best_acc = 0.0
进行10轮训练,并将结果动态打印在终端
train训练
使用到Dropout,想要实现的是在训练过程中失活一部分神经元,而不想在预测过程中失活。因此通过net.train()和net.eval()来管理Dropout方法,在net.train()中开启Dropout方法,而在net.eval()中会关闭掉
1
2
3
4
5
6
7
8
9
10
11
net.train() running_loss = 0.0 t1 = time.perf_counter() for step, data in enumerate (train_loader, start=0 ): images, labels = data optimizer.zero_grad() outputs = net(images.to(device)) loss = loss_function(outputs, labels.to(device)) loss.backward() optimizer.step() running_loss += loss.item()
打印在训练过程中的训练进度,len(train_loader)获取训练一轮所需要的步数step + 1获取当前的轮数
1
2
3
4
5
6
rate = (step + 1 ) / len (train_loader) a = "*" * int (rate * 50 ) b = "*" * int ((1 - rate) * 50 ) print ("\rtrain loss: {:^3.0f}%[{}->{}]{:.3f}" .format (int (rate * 100 ), a, b, loss), end=" " ) print ()print (time.perf_counter() - t1)
validate预测
在net.eval()中会关闭Dropout方法,不让神经元失活
1 2 3 4 5 6 7 8 9 10 11 12 13 14 15 net.eval () acc = 0.0 with torch.no_grad(): for data_test in validate_loader: test_image, test_label = data_test outputs = net(test_image.to(device)) predict_y = torch.max (outputs, dim=1 )[1 ] acc += torch.eq(predict_y, test_label.to(device)).sum ().item() accurate_test = acc / val_num if accurate_test > best_acc: best_acc = accurate_test torch.save(net.state_dict(), save_path) print ('[epoch %d] train_loss: %.3f test_accuracy: %.3f' % (epoch + 1 , running_loss / step, accurate_test)) print ('Finished Training' )
打印结果
1
2
3
4
5
6
7
8
9
10
11
12
13
14
15
16
17
18
19
20
21
22
23
24
25
26
27
28
29
30
31
32
33
34
35
36
37
38
39
40
41
42
43
44
45
46
47
48
49
50
51
52
53
import jsonimport torchfrom PIL import Imagefrom torchvision import transformsimport matplotlib.pyplot as pltfrom model import AlexNetdevice = torch.device("cuda:0" if torch.cuda.is_available() else "cpu" ) data_transform = transforms.Compose( [transforms.Resize((224 , 224 )), transforms.ToTensor(), transforms.Normalize((0.5 , 0.5 , 0.5 ), (0.5 , 0.5 , 0.5 ))]) img = Image.open ("tulip.jpg" ) plt.imshow(img) img = data_transform(img) img = torch.unsqueeze(img, dim=0 ) try : json_file = open ('./class_indices.json' , 'r' ) class_indict = json.load(json_file) except Exception as e: print (e) exit(-1 ) model = AlexNet(num_classes=5 ).to(device) model_weights_path = "./AlexNet.pth" model.load_state_dict(torch.load(model_weights_path)) model.eval () with torch.no_grad(): output = torch.squeeze(model(img.to(device))).cpu() predict = torch.softmax(output, dim=0 ) predict_cla = torch.argmax(predict).numpy() print (class_indict[str (predict_cla)], predict[predict_cla].item())plt.show()
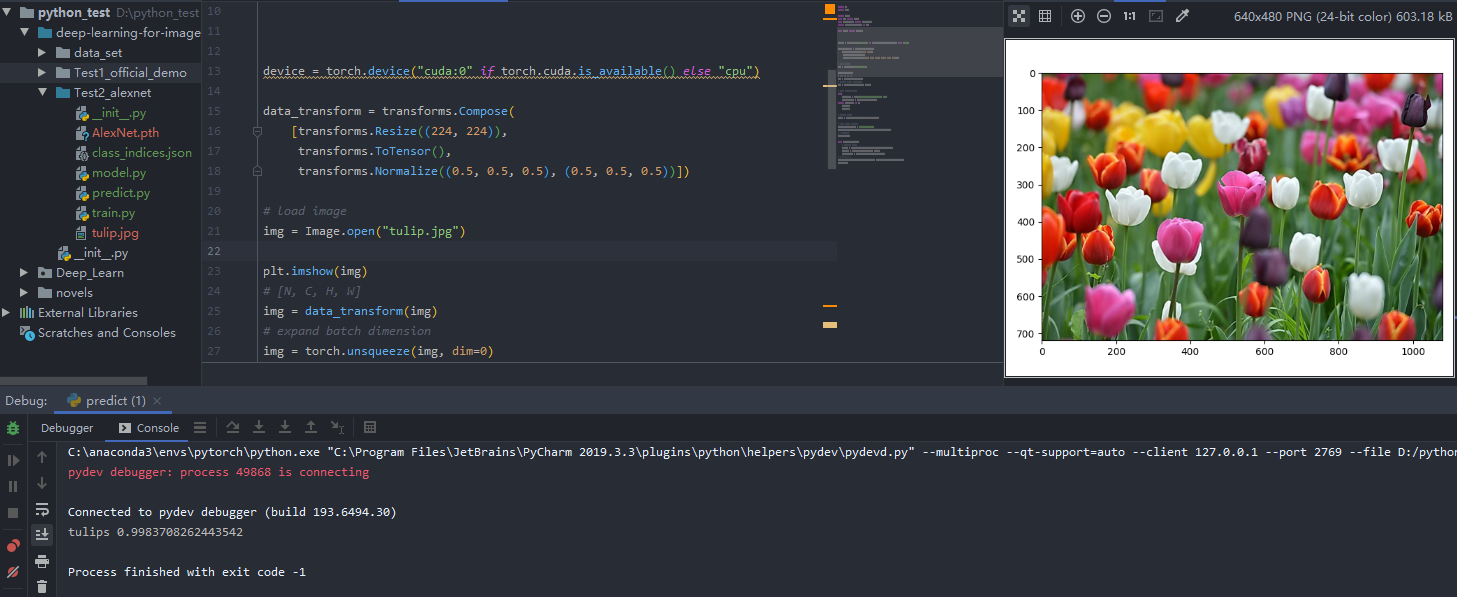
预测结果
总结
如果有需要用到AlexNet训练自己的图片,可以在data_set中更改为自己的图片和对应类别,需要注意的是需要在代码中将num_classes的数值定为自己数据集的分类数量。


